Local Alert RulesCảnh báo tại chỗ IO & Alert Engine
Create rules that make eNode-Gen2 switch a relay or publish an MQTT message when sensor values meet a condition. Rules run on the node itself, so relay control keeps working even when the cloud connection is lost. Tạo Rule để eNode-Gen2 tự bật/tắt relay hoặc gửi bản tin MQTT khi giá trị cảm biến thỏa điều kiện. Rule chạy ngay trên eNode, vì vậy relay vẫn được điều khiển kể cả khi mất kết nối Cloud.
Six Steps6 bước thực hiện
Check these points first so the rule can be created and saved without surprises.Kiểm tra các điểm sau để tạo và lưu Rule suôn sẻ.
- eNode-Gen2 is powered and connected to the network via Ethernet or Wi-Fi.eNode đã được cấp nguồn và kết nối mạng qua Ethernet hoặc Wi-Fi.
- The computer or phone used for setup is on the same LAN / Wi-Fi as the eNode (or joined to the eNode's own Wi-Fi, see Step 2 – Method B).Máy tính/điện thoại dùng để cấu hình kết nối cùng mạng LAN/Wi-Fi với eNode (hoặc kết nối Wi-Fi do eNode phát, xem Bước 2 – Cách B).
- The channels you want to use as conditions (e.g.
temp,humi) are declared in Polling Configuration and saved with ⚡ Apply All → 💾 Save All to Flash.Các kênh đo muốn dùng làm điều kiện (ví dụtemp,humi) đã được khai báo trong Polling Configuration và đã bấm ⚡ Apply All → 💾 Save All to Flash. - To drive a relay, the device must be a version with relays: Version A or Version TH (2 relays each).Muốn điều khiển relay: thiết bị phải là phiên bản có relay: Version A hoặc Version TH (mỗi bản 2 relay).
- Use Chrome or Safari, not an in-app mobile browser.Dùng Chrome hoặc Safari, không dùng trình duyệt nhúng trong ứng dụng di động.
Goal: know the local IP address of the eNode so you can open its Web UI in Step 2.Mục tiêu: biết địa chỉ IP nội bộ của eNode để mở giao diện Web ở Bước 2.
- In HBQConnect, open the device dashboard and select the Thông tin thiết bị (Device information) tab 1.Trên HBQConnect, mở dashboard của thiết bị và chọn tab Thông tin thiết bị 1.
- Check Ethernet Status 2 to see whether an Ethernet cable is connected.Xem ô Ethernet Status 2 để biết eNode đang có cắm cáp mạng hay không.
- Pick the IP address from the table below and note it down.Chọn IP theo bảng dưới đây và ghi lại.
| ConnectionTình trạng kết nối | Use the IP inDùng IP ở ô | NotesGhi chú |
|---|---|---|
| Ethernet cable connectedCó cắm cáp Ethernet | Local LAN IP 3 | Assigned automatically by the router (DHCP).IP do router cấp tự động (DHCP). |
| Ethernet cable not connected (Ethernet Status = Disconnected)Không cắm cáp Ethernet (Ethernet Status = Disconnected) | Local Wifi 4 | Shown only when the eNode is connected to the cloud.Chỉ hiển thị khi eNode đã kết nối Cloud. |
192.168.1.250.
Ví dụ (hình dưới): Ethernet Status đang là Disconnected, nên dùng Local Wifi IP là 192.168.1.250.

Use the IP address from Step 1.Dùng IP lấy ở Bước 1.
- Connect the computer to the same LAN / Wi-Fi as the eNode.Kết nối máy tính vào cùng mạng LAN/Wi-Fi với eNode.
- Open Chrome or Safari, type
http://<IP address>and press Enter. Example:http://192.168.1.250Mở Chrome hoặc Safari, gõhttp://<địa chỉ IP>rồi nhấn Enter. Ví dụ:http://192.168.1.250 - The ENODE-GEN2 WEB UI opens, with its functions in the left menu.Trang ENODE-GEN2 WEB UI hiện ra, các chức năng nằm ở menu bên trái.
When the IP is unknown, the eNode is not on the cloud, or there is no LAN on site.Khi chưa biết IP, eNode chưa kết nối Cloud, hoặc hiện trường không có mạng LAN.
- On a computer or phone, join the Wi-Fi network broadcast by the eNode. Network name and password: ask your administrator.Trên máy tính hoặc điện thoại, kết nối vào mạng Wi-Fi do eNode phát. Tên mạng và mật khẩu: liên hệ quản trị viên.
- Open a browser and go to
http://192.168.4.1/Mở trình duyệt, truy cậphttp://192.168.4.1/ - The Web UI opens, same as Method A.Giao diện Web hiện ra giống Cách A.
- When finished, reconnect to your usual Wi-Fi network.Cấu hình xong, kết nối máy trở lại mạng Wi-Fi thường dùng.
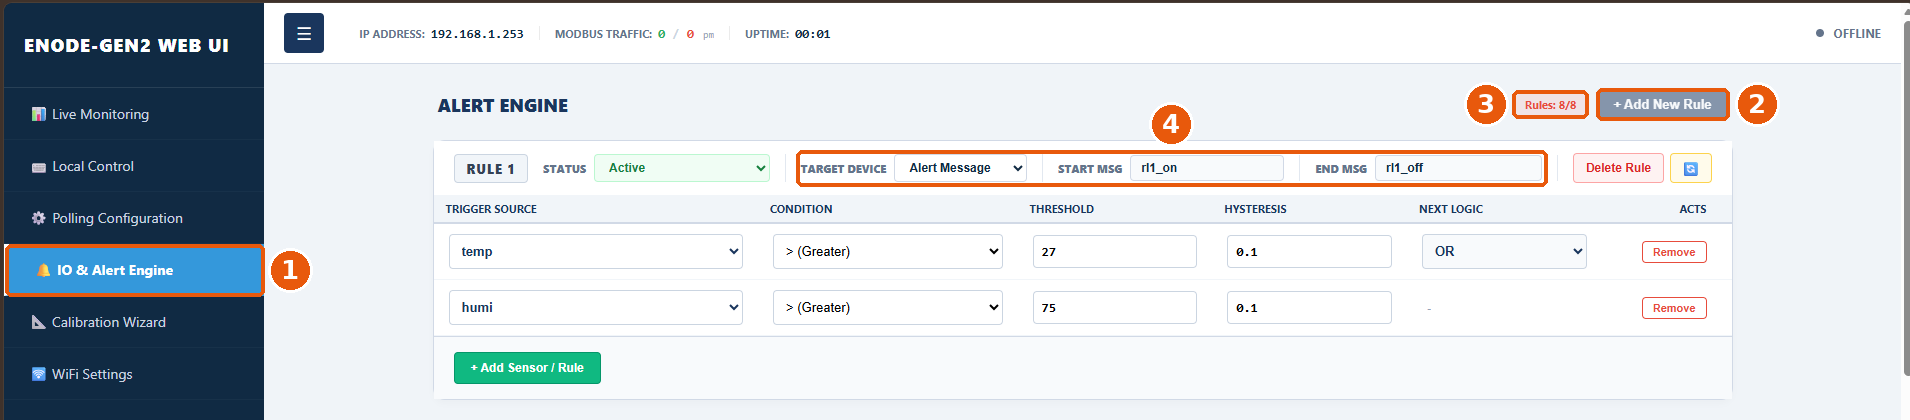
- In the left menu, select 🔔 IO & Alert Engine 1.Ở menu bên trái, chọn 🔔 IO & Alert Engine 1.
- Click + Add New Rule 2 at the top right. A new rule block (RULE 1, RULE 2, …) appears.Bấm + Add New Rule 2 ở góc trên bên phải. Một khung Rule mới (RULE 1, RULE 2, …) xuất hiện.
- The Rules: x/8 counter 3 shows how many rules exist. At 8/8 the + Add New Rule button is greyed out: delete an unused rule first.Bộ đếm Rules: x/8 3 cho biết số Rule đã tạo. Khi bộ đếm là 8/8, nút + Add New Rule bị mờ: cần xóa một Rule không dùng trước khi tạo Rule mới.
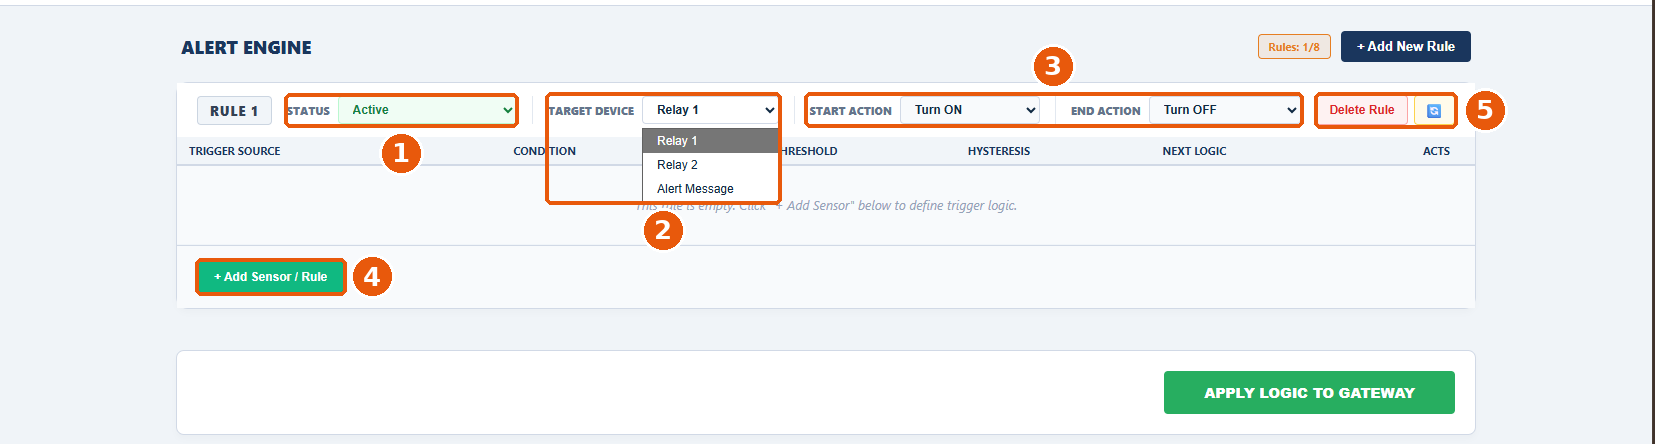
The rule header decides whether the rule runs and what the eNode does when the condition occurs.Phần đầu của mỗi Rule quyết định Rule có chạy hay không, và khi điều kiện xảy ra thì eNode làm gì.
- STATUS 1: Active runs the rule. Inactive pauses it while keeping its settings.STATUS 1: chọn Active để Rule hoạt động. Chọn Inactive để tạm dừng Rule mà vẫn giữ cấu hình.
- TARGET DEVICE 2: Relay 1 / Relay 2 switch a relay on the eNode; Alert Message publishes an MQTT message to the configured broker and does not drive a relay.TARGET DEVICE 2: Relay 1 / Relay 2 bật/tắt relay trên eNode; Alert Message gửi bản tin MQTT lên MQTT Broker đã cấu hình, không điều khiển relay.
- Set the action 3 for the selected target (table below).Thiết lập hành động 3 theo Target Device đã chọn (bảng dưới).
- To delete the rule, click Delete Rule or the icon button next to it 5.Muốn xóa Rule: bấm Delete Rule hoặc nút biểu tượng bên cạnh 5.
| FieldTrường | Shown when target isHiện khi Target là | MeaningÝ nghĩa |
|---|---|---|
| START ACTION | Relay 1 / Relay 2 | Action when the rule condition becomes true: Turn ON or Turn OFF.Hành động khi điều kiện của Rule bắt đầu đúng: Turn ON (bật) hoặc Turn OFF (tắt). |
| END ACTION | Relay 1 / Relay 2 | Action when the rule condition is no longer true: Turn ON or Turn OFF.Hành động khi điều kiện của Rule hết đúng: Turn ON hoặc Turn OFF. |
| START MSG | Alert Message | MQTT message sent when the condition becomes true. Max 32 characters.Nội dung bản tin MQTT gửi khi điều kiện bắt đầu đúng. Tối đa 32 ký tự. |
| END MSG | Alert Message | MQTT message sent when the condition is no longer true. Max 32 characters.Nội dung bản tin MQTT gửi khi điều kiện hết đúng. Tối đa 32 ký tự. |
- Typical use: START ACTION = Turn ON, END ACTION = Turn OFF → the relay is on during the alert and off afterwards.Cách dùng thông thường: START ACTION = Turn ON, END ACTION = Turn OFF → relay bật khi có cảnh báo, tắt khi hết cảnh báo.
- Cut a load during the alert (e.g. stop a pump at high water level): START ACTION = Turn OFF, END ACTION = Turn ON.Muốn ngắt tải khi có cảnh báo (ví dụ ngắt bơm khi mực nước cao): START ACTION = Turn OFF, END ACTION = Turn ON.
- Alert Message example (Step 3 figure, 4): START MSG =
rl1_on, END MSG =rl1_off→ the eNode publishes “rl1_on” when the condition occurs and “rl1_off” when it ends.Ví dụ Alert Message (hình ở Bước 3, 4): START MSG =rl1_on, END MSG =rl1_off→ eNode gửi “rl1_on” khi điều kiện xảy ra và gửi “rl1_off” khi điều kiện kết thúc.
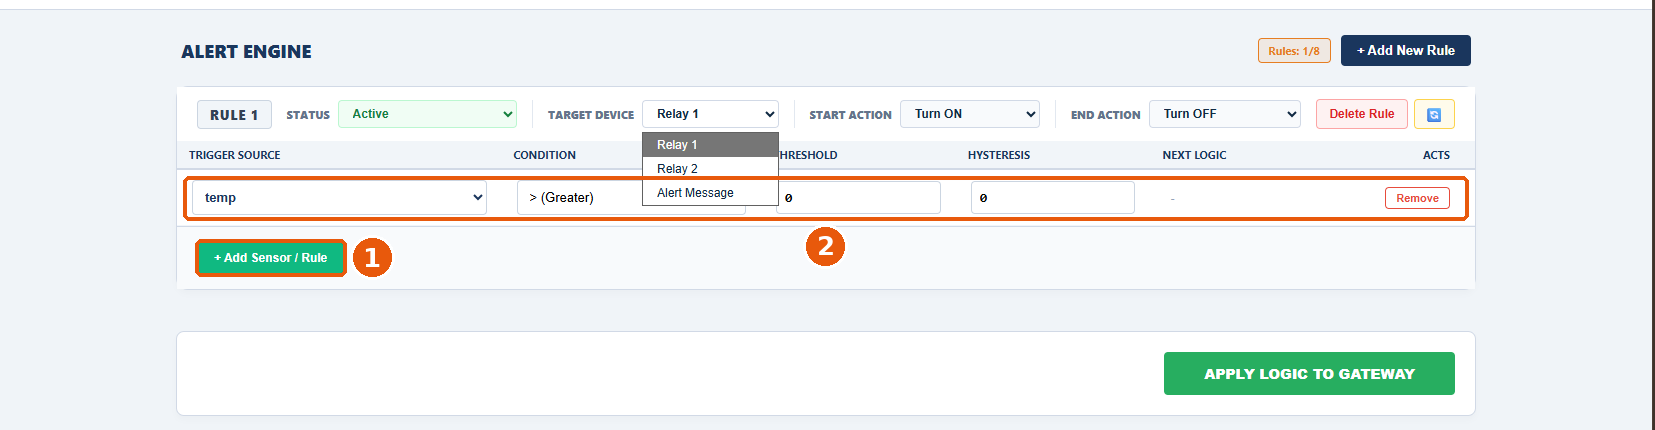
- Click + Add Sensor / Rule 1. A new condition row 2 appears with default values.Bấm + Add Sensor / Rule 1. Một dòng điều kiện mới 2 xuất hiện với giá trị mặc định.
- Fill in each column as described in the table below.Điền các cột của dòng điều kiện theo bảng bên dưới.
- For more conditions, click + Add Sensor / Rule again. Up to 8 conditions per rule.Cần nhiều điều kiện thì bấm + Add Sensor / Rule thêm lần nữa. Mỗi Rule có tối đa 8 điều kiện.
| ColumnCột | MeaningÝ nghĩa | ExampleVí dụ |
|---|---|---|
| TRIGGER SOURCE | Channel used as the condition. The list only contains channels declared in Polling Configuration.Kênh đo dùng làm điều kiện. Danh sách chỉ gồm các kênh đã khai báo trong Polling Configuration. | temp |
| CONDITION | > Greater · < Less · = Equal · ≠ Not Equal> lớn hơn · < nhỏ hơn · = bằng · ≠ khác | > (Greater) |
| THRESHOLD | Comparison threshold, in the channel's unit.Ngưỡng so sánh, cùng đơn vị với kênh đo. | 25 |
| HYSTERESIS | Dead band that stops the rule from toggling when the value hovers around the threshold; channel's unit. See 5.2.Khoảng đệm để Rule không bật/tắt liên tục khi giá trị dao động quanh ngưỡng; cùng đơn vị với kênh đo. Xem 5.2. | 1 |
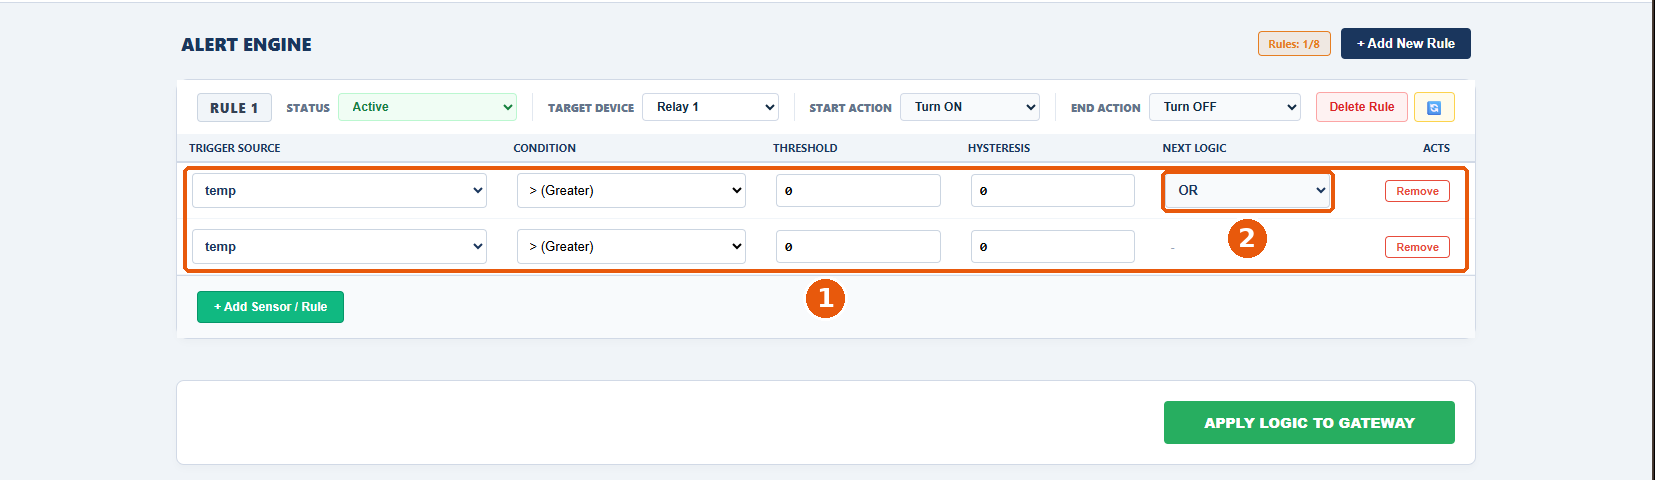
| NEXT LOGIC | Joins this row with the row directly below: AND or OR. The last row shows “-”. See 5.3.Cách nối dòng này với dòng ngay bên dưới: AND hoặc OR. Dòng cuối cùng hiển thị “-”. Xem 5.3. | OR |
| Remove | Deletes the condition row (ACTS column).Xóa dòng điều kiện (cột ACTS). | – |
Hysteresis separates the switch-on and switch-off levels: a condition becomes true when the value crosses the threshold, but only stops being true once the value moves back past the threshold by the hysteresis amount.Hysteresis tạo khoảng đệm giữa mức bật và mức tắt: điều kiện bắt đầu đúng khi giá trị vượt Threshold, nhưng chỉ hết đúng khi giá trị lùi lại quá Threshold thêm một khoảng bằng Hysteresis.
| CONDITION | Becomes true whenBắt đầu đúng khi | Stops being true whenHết đúng khi |
|---|---|---|
| > (Greater) | value > Thresholdgiá trị > Threshold | value < Threshold − Hysteresisgiá trị < Threshold − Hysteresis |
| < (Less) | value < Thresholdgiá trị < Threshold | value > Threshold + Hysteresisgiá trị > Threshold + Hysteresis |
Hysteresis is also applied to = (Equal) and ≠ (Not Equal).Với = (Equal) và ≠ (Not Equal), eNode cũng áp dụng Hysteresis.
temp > 25, Hysteresis = 1. Above 25 °C → true. Drops to 24.5 °C → still true (inside the band). Below 24 °C → false.
Ví dụ: temp > 25, Hysteresis = 1. Nhiệt độ lên quá 25 °C → điều kiện đúng. Giảm về 24,5 °C → vẫn đúng (đang trong khoảng đệm). Xuống dưới 24 °C → hết đúng.
- AND: true when both conditions are true.AND: đúng khi cả hai điều kiện cùng đúng.
- OR: true when at least one condition is true.OR: đúng khi ít nhất một điều kiện đúng.
- Precedence follows C/C++: AND is evaluated before OR.Thứ tự ưu tiên giống C/C++: AND được tính trước OR.
| Condition rows (top to bottom)Các dòng điều kiện (từ trên xuống) | Evaluated aseNode hiểu là |
|---|---|
| A OR B | A || B |
| A AND B OR C | (A && B) || C |
| A OR B AND C | A || (B && C) |
(A OR B) AND C, create 4 rows: A AND C OR B AND C (row 1 = A, row 2 = C, row 3 = B, row 4 = C).
Mẹo: giao diện không có dấu ngoặc. Muốn có (A OR B) AND C, hãy tạo 4 dòng: A AND C OR B AND C (dòng 1 = A, dòng 2 = C, dòng 3 = B, dòng 4 = C).
Requirement: turn Relay 1 on when temperature > 25 °C or humidity > 60 %RH; turn it off when both are back to normal.Yêu cầu: bật Relay 1 khi nhiệt độ > 25 °C hoặc độ ẩm > 60 %RH; tắt Relay 1 khi cả hai trở lại bình thường.
| RowDòng | TRIGGER SOURCE | CONDITION | THRESHOLD | HYSTERESIS | NEXT LOGIC |
|---|---|---|---|---|---|
| 1 | temp | > (Greater) | 25 | 1 | OR |
| 2 | humi | > (Greater) | 60 | 1 | - |
Then save with Step 6 (APPLY LOGIC TO GATEWAY 4).Sau đó lưu cấu hình theo Bước 6 (nút APPLY LOGIC TO GATEWAY 4).
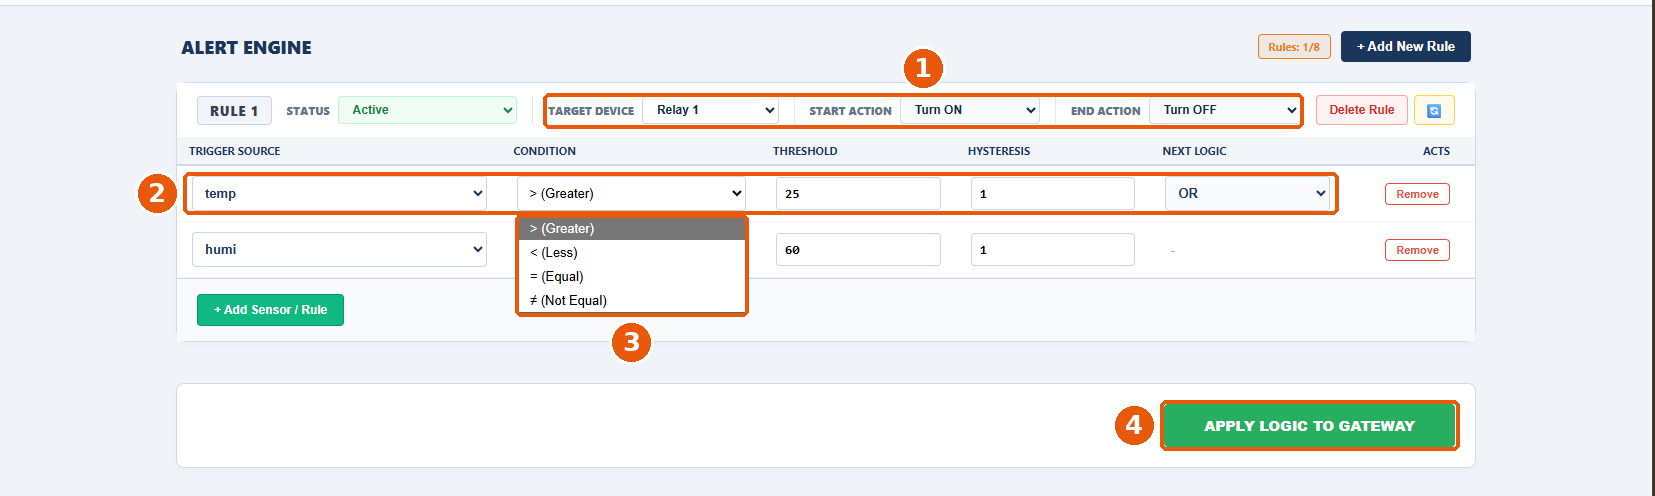
- Click APPLY LOGIC TO GATEWAY at the bottom of the page, below the rules (Example figure, 4).Bấm APPLY LOGIC TO GATEWAY ở cuối trang, bên dưới các Rule (hình Ví dụ, 4).
- All rules are stored in the eNode's Flash memory and survive a restart. “Gateway” on this button means the eNode itself.Toàn bộ Rule được lưu vào bộ nhớ Flash của eNode và vẫn giữ nguyên sau khi khởi động lại. “Gateway” trên nút này chính là eNode.
- Relay: in the Web UI, open 📊 Live Monitoring and watch Relay 1 / Relay 2 change state when the condition occurs.Relay: trên giao diện Web, mở 📊 Live Monitoring và xem trạng thái Relay 1 / Relay 2 thay đổi khi điều kiện xảy ra.
- HBQConnect: the Alert Rule Config panel (Step 1 figure, 5) updates to show the saved rules.HBQConnect: mục Alert Rule Config (hình ở Bước 1, 5) được cập nhật theo các Rule vừa lưu.
- Alert Message: check that the START MSG / END MSG messages arrive at the MQTT broker or receiving platform.Alert Message: kiểm tra bản tin START MSG / END MSG trên MQTT Broker hoặc nền tảng nhận dữ liệu.
| SymptomHiện tượng | What to doCách xử lý |
|---|---|
| Web UI does not open by IPKhông mở được trang Web bằng IP | Make sure the computer is on the eNode's network. Re-check Ethernet Status to use the right IP (LAN or Wi-Fi), or connect via SoftAP http://192.168.4.1/.Kiểm tra máy tính cùng mạng với eNode. Xem lại Ethernet Status để dùng đúng IP (LAN hay Wi-Fi), hoặc vào qua SoftAP http://192.168.4.1/. |
| No IP shown in HBQConnectKhông thấy IP trên HBQConnect | The eNode is not connected to the cloud. Use SoftAP (Step 2 – Method B).eNode chưa kết nối Cloud. Vào giao diện Web qua SoftAP (Bước 2 – Cách B). |
| Needed channel missing from Trigger SourceTrigger Source không có kênh cần dùng | Declare the channel in Polling Configuration, click Apply All → Save All to Flash, then reopen IO & Alert Engine.Khai báo kênh trong Polling Configuration, bấm Apply All → Save All to Flash, rồi mở lại trang IO & Alert Engine. |
| + Add New Rule is greyed outNút + Add New Rule bị mờ | All 8/8 rules are used. Delete an unused rule.Đã đủ 8/8 Rule. Xóa một Rule không dùng. |
| Relay chatters on/offRelay đóng/ngắt liên tục | Hysteresis is 0 or too small. Increase it.Hysteresis bằng 0 hoặc quá nhỏ. Tăng Hysteresis. |
| Relay does not switchRelay không tác động | Check: STATUS = Active; device is Version A or TH; APPLY LOGIC TO GATEWAY was clicked; the value in Live Monitoring really crossed the threshold.Kiểm tra: STATUS = Active; thiết bị là Version A hoặc TH; đã bấm APPLY LOGIC TO GATEWAY; giá trị đo ở Live Monitoring đã thực sự vượt ngưỡng. |
| Alert Message not receivedKhông nhận được Alert Message | Check the MQTT Broker tab and the eNode's network connection; START MSG / END MSG must be 32 characters or fewer.Kiểm tra cấu hình tab MQTT Broker và kết nối mạng của eNode; START MSG / END MSG không quá 32 ký tự. |
| Rules lost after restartRule bị mất sau khi khởi động lại | APPLY LOGIC TO GATEWAY was not clicked. Reconfigure and apply.Chưa bấm APPLY LOGIC TO GATEWAY. Cấu hình lại và bấm APPLY. |